- 在你的專案底下,建立一個 class ,繼承 System.Configuration.Install.Installer
範例:[RunInstaller(true)] public partial class InstallerHelp : Installer { public override void Install(IDictionary stateSaver) { base.Install(stateSaver); string strKey = Context.Parameters[“KeyValue”]; string sPath = @”c:\Test.txt”; if (File.Exists(sPath)) File.Delete(sPath); File.WriteAllText(sPath, strKey); } } - 在你的 Installer Porject 右鍵 ->「View」->「檔案系統」;
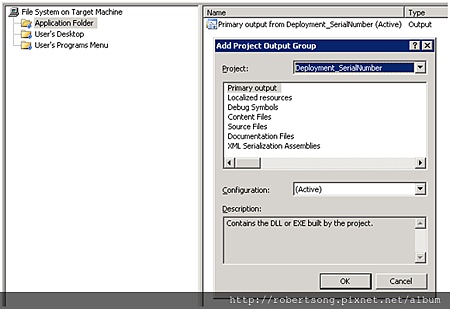
「Application Folder」-> 右鍵 ->「Add」->「專案輸出」;
選擇你的專案(含有 InstallerHelp class) -> 選「主要輸出」->「確定」。
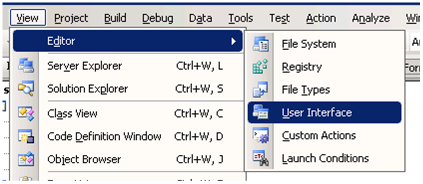
- Installer Porject 右鍵 ->「View」->「使用者介面」;
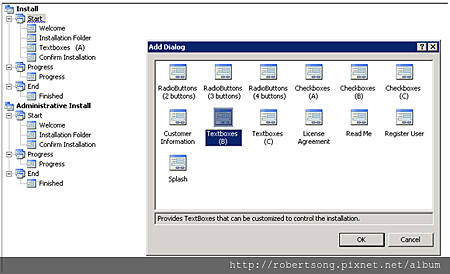
在「Start」右鍵 ->「加入對話方塊」-> 選擇「對話方塊(A)」->「OK」。
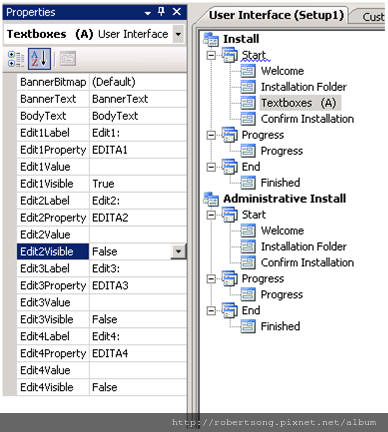
- 「對話方塊(A)」屬性
選擇哪幾個項目(Edit)要顯示給使用者輸入。
留意這裡的 Edit1Property 值,接下來會參考到。
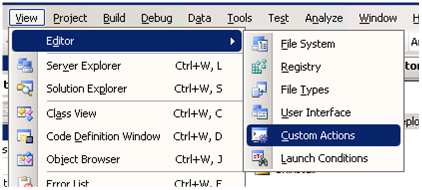
- Installer Porject 右鍵 ->「View」->「自訂動作」;
在「Install」點右鍵 ->「加入自訂動作」;
選擇你剛剛在「Application Folder」加入的專案。
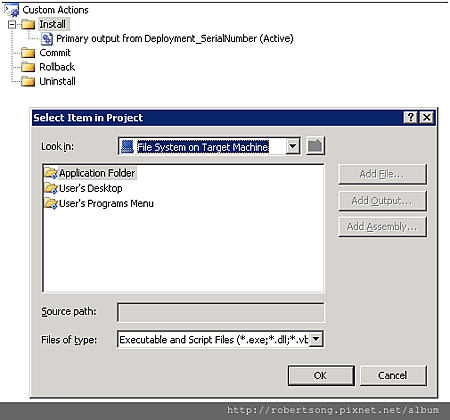
- 打開 剛才加入的「主要輸出 from [你的專案名] (Active)」「屬性視窗」(右鍵);
「CustomerActionData」設定 /KeyValue=[EDITA1]。
( 安裝專案(右鍵) ->「View」->「自訂動作」)
- 這樣,你的程式就可以接收到 使用者在安裝畫面上 輸入的值了~。
以上圖文,接取自:Setup and Deployment : Custom Action to Capture User Input
另一參考(內容一樣):Customize User Interfaces and Pass User Input to Installer Classes
更多一樣的參考內容(如果有連結壞了,可以互補):
Building an Installer – Part 1
Building an Installer – Part 2
Building an Installer – Part 3
User Interface View
Create an EXE or Setup File in .NET Windows Application
[C#] 使用Setup Project,在安裝過程中修改Config設定
如何將自訂參數傳入 Installer 類別的 Install 方法
如何將自訂參數傳入 Installer 類別的 Install 方法 ( Part 2 )
Getting Started With Setup Projects
HOW TO: Creating your MSI installer using Visual Studio 2008
Custom User Interface for MSI Packages Using C# .NET
How to create a custom install program
Visual Studio Setup – projects and custom actions


 留言列表
留言列表
